Building AI Content Workflows with Make.com: Complete Guide
Learn how to build automated AI content workflows using Make.com. Step-by-step guide to integrating OpenAI, Claude, WordPress, and Ghost for automated content creation.
Jump to section
AI content automation has moved from experimental to essential. According to Make.com’s 2026 report, AI usage in their scenarios quadrupled over 2024, with content marketing workflows leading the adoption curve. Whether you’re a solo content creator or managing a team, learning to build AI content workflows can save hundreds of hours while improving output quality. If you’re comparing automation platforms, our Zapier vs Make.com comparison can help you decide which is right for your needs.
Make.com (formerly Integromat) has emerged as the strategic middle ground between simple task automation tools and custom-coded solutions. With over 3,000+ app integrations and native support for OpenAI and Claude, it’s become the go-to platform for visual AI workflow automation.
This guide will walk you through building production-ready AI content workflows, from basic scenario creation to advanced multi-platform publishing systems.
Understanding Make.com for Content Automation
Make.com is a visual workflow automation platform that connects apps, APIs, and services through a drag-and-drop interface. Unlike traditional automation tools that limit you to pre-built workflows, Make.com lets you design custom scenarios with conditional logic, data transformation, and error handling.
Why Make.com for Content Workflows?
Visual Workflow Builder: See your entire automation pipeline at a glance. Each module represents an action (fetch data, call AI, publish content) connected by execution paths.
Native AI Integration: Built-in modules for OpenAI, Claude, and Azure OpenAI eliminate the need for complex API configuration. Add an AI module, paste your API key, and start generating content.
Real-Time Execution: Unlike batch processors, Make.com executes workflows in real-time with live data flow visualization. Watch data move through your pipeline and catch errors immediately.
Flexible Scheduling: Run scenarios on-demand, on a schedule (every hour, daily, weekly), or triggered by external events (new form submission, webhook, RSS feed update).
Key Concepts: Scenarios, Modules, and Operations
Scenarios: A complete workflow from trigger to final action. Example: “When new topic added to Google Sheets, generate article with Claude, publish to WordPress.”
Modules: Individual steps in a scenario. Each module performs one action - fetch data, transform text, call an API, send an email.
Operations: Billable units. Each module execution consumes 1 operation. AI modules may consume additional credits depending on token usage.
Routes: Conditional paths in your scenario. Example: If content quality score > 80, publish immediately. Otherwise, send for human review.
Data Stores: Persistent storage for tracking workflow state. Use these to prevent duplicate processing, store generated content, or maintain publishing history.
Setting Up Your First AI Content Workflow
Let’s build a complete workflow that generates blog posts using Claude and publishes them to WordPress. This tutorial assumes you have:
- A Make.com account (free tier works)
- Claude API key from console.anthropic.com
- WordPress site with Application Password enabled
Step 1: Create a New Scenario
- Log into Make.com and click Create a new scenario
- The visual editor opens with an empty canvas
- Click the + button to add your first module
Step 2: Add a Trigger Module
For this tutorial, we’ll use a webhook trigger so you can start the workflow on-demand:
- Search for Webhooks in the module list
- Select Custom Webhook
- Click Create a webhook
- Name it “Content Trigger” and save
- Copy the webhook URL - you’ll use this to trigger the workflow
Step 3: Configure Claude for Content Generation
Now add the AI module that generates your content:
- Click + after the webhook module
- Search for Anthropic Claude
- Select Create a Completion
- Click Create a connection
- Paste your Claude API key and save
Configure the Claude module:
Model: claude-3-5-sonnet-20241022 (balance of quality and speed)
System Prompt:
You are an expert SEO content writer. Create comprehensive, engaging blog posts optimized for search engines and readers. Include an introduction, detailed body sections with subheadings, and a conclusion with call-to-action.User Message:
Write a 1500-word blog post about: {{1.topic}}
Target keyword: {{1.keyword}}Audience: {{1.audience}}
Include:- Compelling introduction with the keyword- 4-5 H2 sections with detailed explanations- Practical examples and actionable tips- Natural keyword variations throughout- Engaging conclusion with call-to-action
Max Tokens: 4096
The {{1.topic}} syntax references data from module 1 (the webhook). When you trigger the workflow, send JSON like:
{ "topic": "AI Content Automation Best Practices", "keyword": "ai content automation", "audience": "content marketers and marketing managers"}Step 4: Parse the AI Response
Claude returns content as text. Before publishing, we need to extract and format it:
- Add a Text Parser module after Claude
- Select Match Pattern
- Pattern:
(.+)(captures all text) - Text:
{{2.result.content.0.text}}(Claude’s response)
This step isn’t strictly necessary for simple workflows, but it’s useful for extracting specific sections or validating output.
Step 5: Generate SEO Metadata
Add another Claude module to generate title and meta description:
- Add Anthropic Claude > Create a Completion
- Use the same connection as before
User Message:
Based on this article content, generate:
1. SEO-optimized title (60 characters max)2. Meta description (155 characters max)3. 5 relevant tags
Article content:{{2.result.content.0.text}}
Target keyword: {{1.keyword}}
Return as JSON:{  "title": "...",  "meta_description": "...",  "tags": ["tag1", "tag2", "tag3", "tag4", "tag5"]}
Max Tokens: 500
Step 6: Publish to WordPress
Now connect to WordPress to publish the generated content:
- Add WordPress > Create a Post
- Click Create a connection
- Enter your WordPress URL:
https://yourblog.com - Username: Your WordPress username
- Password: Your Application Password (not your login password)
Configure the post details:
Title: {{4.result.content.0.text.title}} (from the metadata module)
Content: {{2.result.content.0.text}} (from the main content module)
Status: draft (review before publishing) or publish (auto-publish)
Categories: Select relevant categories from the dropdown
Tags: {{4.result.content.0.text.tags}} (from the metadata module)
Post Format: standard
Step 7: Test Your Workflow
- Click Run once at the bottom of the editor
- In another tab, send a POST request to your webhook URL:
curl -X POST https://hook.eu1.make.com/xxxxxxxxxxxxx \ -H "Content-Type: application/json" \ -d '{ "topic": "Getting Started with AI Content Automation", "keyword": "ai content automation guide", "audience": "small business owners and marketers" }'Watch the scenario execute in real-time. Each module lights up as it processes, showing you the data flowing through your workflow.
Step 8: Handle Errors Gracefully
Add error handling to make your workflow production-ready:
- Click on the Claude content generation module
- Click the wrench icon > Error handler
- Add Ignore module to skip failed generations without breaking the workflow
Alternatively, add an Error Handler > Send Email to notify you when something fails.
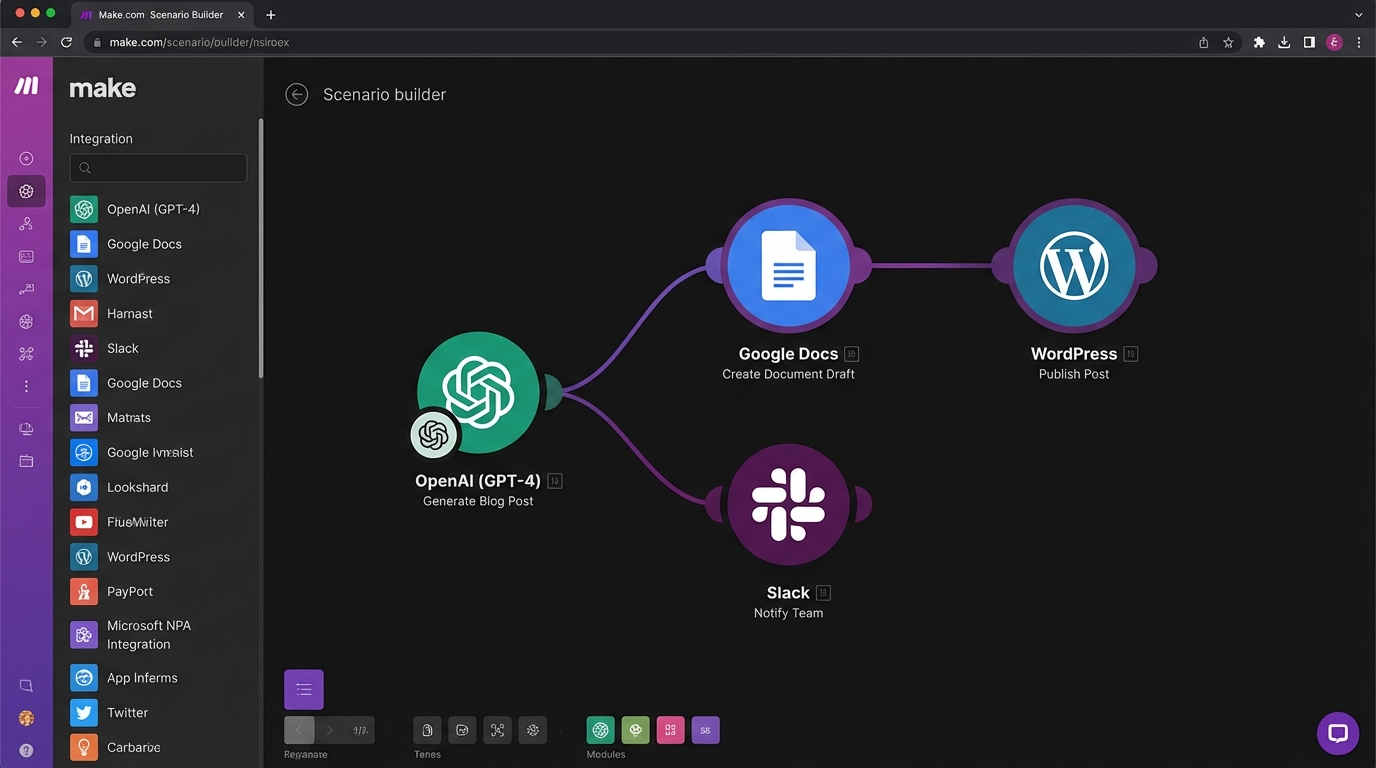
Advanced Workflow: Multi-AI Pipeline with Quality Control
Let’s build a more sophisticated workflow that uses both OpenAI and Claude, includes quality checks, and publishes to multiple platforms.
Workflow Architecture
Trigger (Google Sheets new row) ↓OpenAI GPT-4 (Generate outline) ↓Filter (Check outline length > 500 chars) ↓Claude 3.5 Sonnet (Write full article from outline) ↓OpenAI GPT-4 (Quality check & scoring) ↓Router: - Score > 80 → Publish to WordPress + Ghost - Score 60-79 → Send to Slack for review - Score < 60 → Regenerate with ClaudeImplementation Steps
1. Add Google Sheets Trigger
- Module: Google Sheets > Watch Rows
- Select your content planning spreadsheet
- Trigger column: “Status” = “Ready to Generate”
2. Generate Outline with OpenAI
- Module: OpenAI > Create a Completion
- Model:
gpt-4-turbo-preview - Prompt:
Create a detailed outline for: {{1.Topic}}
Include:- Introduction angle- 5 main sections with H2 headings- 3 subpoints per section- Conclusion approach
Target keyword: {{1.Keyword}}Word count target: {{1.WordCount}}
3. Content Quality Filter
- Module: Filter
- Condition:
{{2.result.choices.0.message.content}} length > 500 - Label: “Outline Quality Check”
This prevents proceeding with low-quality or incomplete outlines.
4. Generate Article with Claude
- Module: Anthropic Claude > Create a Completion
- Model:
claude-3-5-sonnet-20241022 - Max Tokens: 8000
- Prompt:
Write a comprehensive {{1.WordCount}}-word article based on this outline:
{{2.result.choices.0.message.content}}
Requirements:- Engaging introduction with hook- Detailed sections matching the outline structure- Natural integration of keyword: {{1.Keyword}}- Practical examples and actionable advice- Compelling conclusion with CTA
Tone: {{1.Tone}}Audience: {{1.Audience}}
5. Quality Scoring with OpenAI
- Module: OpenAI > Create a Completion
- Model:
gpt-4-turbo-preview - Prompt:
Analyze this article and score it 0-100 on:- Content quality (40%)- SEO optimization (30%)- Readability (20%)- Structure (10%)
Article:{{4.result.content.0.text}}
Return JSON:{  "overall_score": 85,  "quality_score": 90,  "seo_score": 82,  "readability_score": 88,  "structure_score": 80,  "feedback": "Detailed feedback here",  "improvements": ["suggestion 1", "suggestion 2"]}
6. Add Router for Quality-Based Actions
- Module: Router (creates multiple execution paths)
Route 1 - High Quality (Score > 80):
Filter: {{5.result.choices.0.message.content.overall_score}} > 80Actions:
- WordPress > Create a Post (status: draft)
- Ghost > Create a Post (status: draft)
- Google Sheets > Update a Row (Status: “Published to review”)
Route 2 - Medium Quality (Score 60-79):
Filter: {{5.result.choices.0.message.content.overall_score}} >= 60 AND <= 79Actions:
- Slack > Send Message to Channel
- Channel: #content-review
- Message:
Article needs review:Topic: {{1.Topic}}Score: {{5.result.choices.0.message.content.overall_score}}Feedback: {{5.result.choices.0.message.content.feedback}}[Link to Google Sheet Row]
Route 3 - Low Quality (Score < 60):
Filter: {{5.result.choices.0.message.content.overall_score}} < 60Actions:
- Repeat Claude generation with stricter prompt
- Log to Data Store for analysis
- Send alert email to content manager
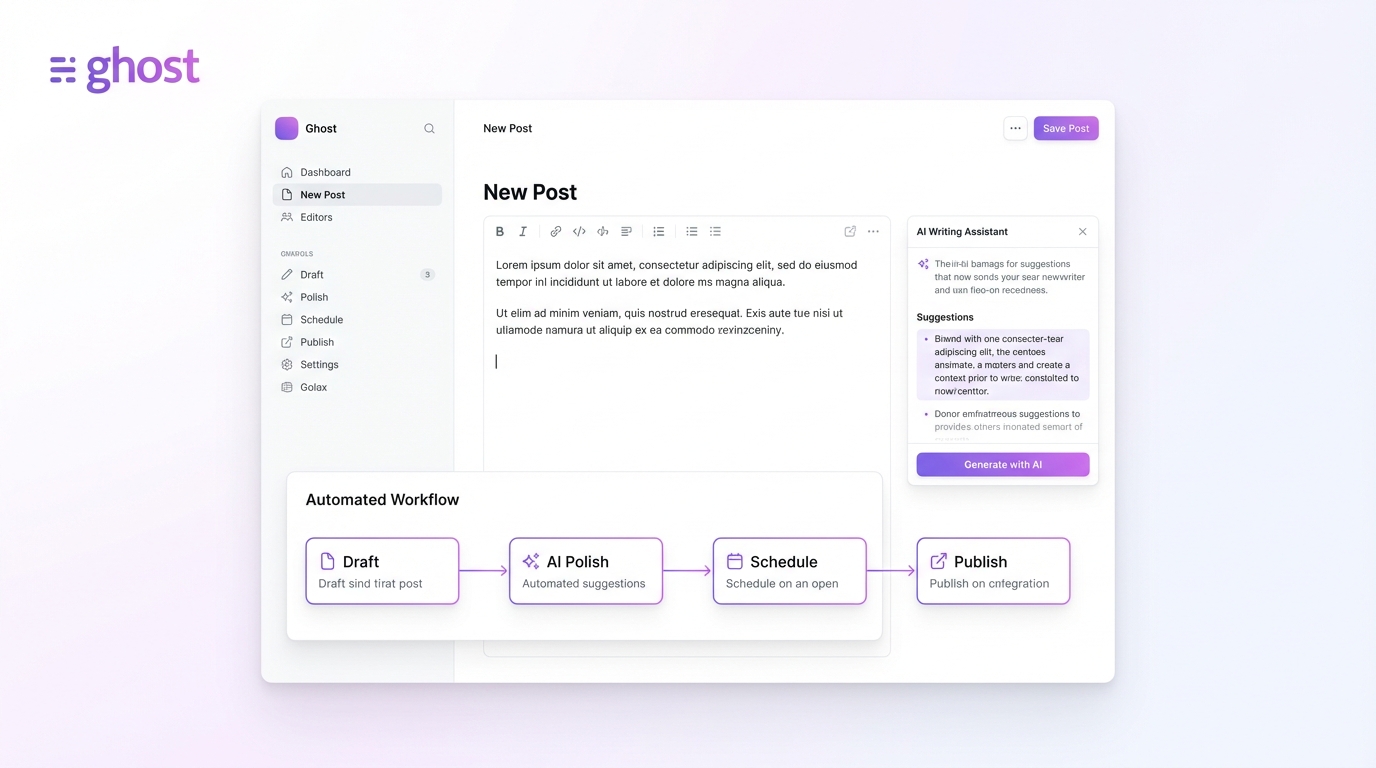
Integrating Ghost CMS
Ghost is a popular headless CMS for modern content creators. Make.com offers native Ghost integration for seamless publishing.
Setting Up Ghost Connection
- Log into your Ghost Admin panel
- Navigate to Settings > Integrations > Custom Integrations
- Click Add custom integration
- Name it “Make.com Automation”
- Copy the Admin API Key and API URL
In Make.com:
- Add Ghost > Create a Post module
- Create connection
- Paste API URL:
https://yourblog.ghost.io - Paste Admin API Key
- Save connection
Ghost Post Configuration
Title: {{4.result.content.0.text}} (from your AI module)
HTML: {{2.result.content.0.text}} (article content)
Status: draft or published
Tags: {{1.tags}} (comma-separated string)
Feature Image URL: Use a stock photo API or AI image generator module
Excerpt: {{6.meta_description}} (auto-generated)
Author ID: Your Ghost author ID (find in Ghost admin URL)
Ghost vs WordPress: When to Use Each
| Feature | WordPress | Ghost |
|---|---|---|
| Best For | Flexibility, plugins, complex sites | Speed, simplicity, modern stack |
| API | REST API (built-in) | Admin API + Content API |
| Content Editor | Gutenberg (blocks) | Mobiledoc (cards) |
| Make.com Integration | Native module | Native module |
| SEO Plugins | Yoast, Rank Math | Basic built-in |
| Membership | Requires plugins | Built-in |
For pure blogging with modern stack, choose Ghost. For complex sites with plugins and customization, choose WordPress. For WordPress-specific automation strategies, see our guide on WordPress AI automation.
Cost Optimization Strategies
Make.com’s credit-based pricing can add up quickly with AI workflows. Here are proven strategies to optimize costs:
1. Use Direct API Calls for High-Volume Workflows
Instead of using Make’s built-in AI modules, call APIs directly via HTTP module:
Standard AI Module Approach (more credits):
Claude Module (consumes AI credits + operation credits)Optimized HTTP Approach (fewer credits):
HTTP Module > POST to api.anthropic.com ↓ (only operation credits for HTTP call)AI processing billed directly by AnthropicHTTP Module Configuration for Claude:
- URL:
https://api.anthropic.com/v1/messages - Method: POST
- Headers:
x-api-key:your-claude-api-keyanthropic-version:2023-06-01content-type:application/json
- Body:
{ "model": "claude-3-5-sonnet-20241022", "max_tokens": 4096, "messages": [ { "role": "user", "content": "{{1.prompt}}" } ]}Cost Comparison:
- Built-in module: 3-5 Make credits + AI token cost
- HTTP module: 1 Make credit + AI token cost (directly to provider)
For workflows running 100+ times per day, this saves 40-60% on Make.com credits.
2. Optimize Workflow Frequency
Don’t run scenarios every minute if hourly is sufficient:
- Every 15 minutes: 2,880 executions/month
- Every hour: 720 executions/month
- Every 6 hours: 120 executions/month
Use webhook triggers for on-demand execution instead of constant polling.
3. Use Filters to Prevent Unnecessary Processing
Add filters early in your workflow to skip items that don’t need processing:
Example Filter:
Content Length > 100 charsANDStatus = "Ready"ANDNOT PublishedThis prevents wasting credits on empty rows, drafts, or already-processed content.
4. Aggregate Before Processing
If processing multiple items, use the Array Aggregator to batch them:
Without Aggregation:
Watch Google Sheets (100 new rows) ↓Iterator (processes each row separately) ↓Claude Module (100 executions = 300-500 credits)With Aggregation:
Watch Google Sheets (100 new rows) ↓Array Aggregator (combine into single batch) ↓Claude Module with batch prompt (1 execution = 3-5 credits)5. Implement Caching with Data Stores
Store frequently-used data in Make’s data stores to avoid repeated API calls:
Example: Store generated titles, meta descriptions, or common content snippets that can be reused.
- Add Data Store > Get a Record
- Key:
{{1.topic_slug}} - If found, use cached content
- If not found, generate with AI and store result
6. Monitor Credit Usage
From your Make.com dashboard:
- Click Organization > Usage
- View credits consumed per scenario
- Identify high-consumption scenarios
- Refactor or optimize expensive workflows
Real-World Content Automation Scenarios
Scenario 1: SEO Content Factory
Goal: Generate 20 SEO-optimized articles per month from keyword research
Workflow:
- Ahrefs API > Get keyword ideas for seed topic
- Filter keywords by difficulty < 40 and search volume > 500
- Store keywords in Google Sheets
- For each keyword:
- Claude > Generate outline
- Claude > Write article
- WordPress > Create draft post
- Slack notification when batch complete
Operations per month: ~2,500 (within Core plan)
Scenario 2: Social Content Repurposing
Goal: Turn blog posts into social media content automatically
Workflow:
- WordPress > Watch New Posts (webhook)
- Extract post content and title
- OpenAI > Generate 5 Twitter threads from post
- OpenAI > Generate 3 LinkedIn posts from post
- OpenAI > Generate Instagram caption
- Store in Google Sheets for scheduling
- Buffer/Hootsuite > Schedule posts
Operations per post: ~15 credits
Scenario 3: Content Quality Auditor
Goal: Automatically review and improve existing content
Workflow:
- WordPress > List all posts (filter by date > 6 months ago)
- For each post:
- Extract content
- Claude > Analyze SEO quality
- Claude > Suggest improvements
- Generate updated meta description
- Create Google Doc report with recommendations
- Email report to content team
Operations: ~500 for 100 posts
Scenario 4: AI Newsletter Generator
Goal: Weekly newsletter compiled from best-performing content
Workflow:
- Schedule: Every Monday 9 AM
- Google Analytics API > Get top 10 posts from last week
- RSS feed > Pull latest industry news (5 items)
- Claude > Summarize each article (150 words)
- Claude > Write newsletter intro and outro
- Mailchimp > Create campaign with compiled content
- Send preview email to team for approval
Operations per week: ~50 credits
Troubleshooting Common Issues
Issue: “Invalid API Key” Error
Solution:
- Verify API key hasn’t expired
- Check for extra spaces when pasting
- Ensure key has correct permissions
- For Claude: must start with
sk-ant-api03- - For OpenAI: must start with
sk-proj-
Issue: Webhook Not Triggering
Solution:
- Scenario must be active (not just saved)
- Webhook URL must be exact (case-sensitive)
- Check webhook history for incoming requests
- Verify Content-Type header is
application/json - Test with cURL first before integrating
Issue: WordPress Connection Fails
Solution:
- Enable REST API in WordPress (should be on by default)
- Use Application Password, not regular password
- Check if security plugins block REST API
- Verify site URL format:
https://domain.com(no trailing slash) - Test REST API:
https://yoursite.com/wp-json/wp/v2/posts
Issue: AI Module Returns Empty Response
Solution:
- Check max tokens setting (might be too low)
- Verify prompt isn’t empty or malformed
- Check AI provider API status
- Review rate limits on your AI API key
- Look for error messages in Make’s operation history
Issue: High Credit Consumption
Solution:
- Review scenario execution history
- Check for infinite loops or iterators processing too many items
- Add filters early in workflow
- Switch high-volume AI calls to HTTP modules
- Implement caching with data stores
Best Practices for Production Workflows
1. Error Handling is Non-Negotiable
Every AI module should have an error handler:
- Ignore: Skip errors and continue (use for non-critical steps)
- Resume: Retry the operation after specified delay
- Commit: Save data before the error and stop
- Rollback: Undo changes and stop
2. Use Meaningful Module Names
Default names like “Claude 1”, “Claude 2” become confusing. Rename modules:
- “Generate Article Outline”
- “Write Full Content”
- “Create SEO Metadata”
- “Publish to WordPress”
3. Implement Logging
Add Data Store modules to log:
- Scenario execution timestamp
- Input parameters
- Generated content ID
- Publishing status
- Any errors encountered
This creates an audit trail for troubleshooting and analysis.
4. Test with Sample Data First
Before connecting to live data sources:
- Use webhook trigger with manual test data
- Verify each module produces expected output
- Check data mapping between modules
- Test error scenarios (invalid input, API timeouts)
5. Version Control Your Scenarios
Make.com doesn’t offer native version control. Workaround:
- Clone scenario before major changes
- Name clones with version numbers: “Content Generator v1.2”
- Keep previous versions deactivated as backups
- Document changes in scenario description
6. Set Up Monitoring
Configure notifications for:
- Scenario failures (email or Slack)
- High credit usage (80% threshold)
- Successful completions (daily digest)
- Quality score alerts (content below threshold)
7. Optimize for Speed
Make.com scenarios timeout after 40 minutes. For long workflows:
- Split into multiple scenarios connected via webhooks
- Use Sleep modules to respect API rate limits
- Process items in parallel when possible (multiple routes)
Future-Proofing Your AI Workflows
Preparing for GPT-4 Turbo and Claude Opus Updates
AI models evolve rapidly. Design workflows that adapt:
Use Variables for Model Selection:
Model: {{settings.preferred_model}}Store preferred_model in a Google Sheet or data store. Update once to switch all workflows.
Test New Models in Parallel:
Create duplicate routes that process the same content with different models. Compare outputs before fully switching.
Multi-Modal Content Generation
As AI gains image, video, and audio capabilities, design workflows that support multiple content types:
Router based on content_type: - text → Claude/GPT-4 - image → DALL-E/Midjourney - video → Runway/Pika - audio → ElevenLabsAgentic Workflows with Memory
Next-generation AI agents will maintain context across sessions. Prepare by:
- Storing conversation history in data stores
- Implementing feedback loops (AI reviews its own output)
- Building approval workflows (AI suggests, human approves, AI refines)
Automate Your Content Workflow with Suparank
Suparank combines AI content generation with Make.com-style automation in a single platform. No complex scenario building required - just describe what you need and let AI orchestrate the workflow.
Conclusion
Building AI content workflows with Make.com transforms time-consuming content operations into efficient, scalable systems. The visual interface makes complex automation accessible without coding, while native AI integrations eliminate technical barriers.
Start simple: build a single-purpose workflow (generate blog post, publish to WordPress). Master the basics before adding routers, quality checks, and multi-platform publishing. As your confidence grows, expand to more sophisticated pipelines. For a broader overview of AI workflow setup, check out our guide on setting up your AI blog writing workflow.
The content automation landscape will continue evolving rapidly. Make.com’s flexibility ensures your workflows adapt as new AI models, platforms, and capabilities emerge. The workflows you build today form the foundation for tomorrow’s AI-powered content operations.
Key Takeaways:
- Make.com bridges the gap between no-code simplicity and custom automation power
- Native OpenAI and Claude integrations make AI workflows accessible to non-developers
- Cost optimization through HTTP modules and filters can reduce expenses by 40-60%
- Quality control routers ensure only high-quality content reaches publication
- Multi-platform publishing maximizes content reach with minimal additional effort
What will you automate first?
Sources
- AI Automation | Add AI Into Your Business Workflows - Make.com
- Make.com 2026: AI Agents, Visual Automation & No-Code Workflow Guide
- What Is AI Automation | AI Workflows & Examples 2025
- Anthropic Claude - Apps Documentation
- Claude API | How to Get an API Key and Start Using It
- Ghost Integration | Workflow Automation | Make
- WordPress Integration | Workflow Automation
- Make.com Credit Costs Explained: What You’re Paying For?
- Make.com Credits Explained: Why Your Automations Suddenly Cost More
- Make.com Automation Tutorial for Beginners - YouTube
Frequently Asked Questions
How much does Make.com cost for AI content workflows?
Can I use both OpenAI and Claude in the same Make.com workflow?
What's the difference between Make.com's built-in AI modules and HTTP API calls?
How do I prevent duplicate content when publishing to multiple platforms?
Tags
More articles

Claude MCP vs ChatGPT for Content Creation: Which is Better in 2026?
Compare Claude's Model Context Protocol with ChatGPT's GPTs for content creation. Feature-by-feature analysis, pricing breakdown, and use case recommendations.

Ghost CMS + AI: Building an Automated Content Workflow
Learn how to automate your Ghost CMS content creation with AI. Complete guide to integrating AI tools, APIs, and automation platforms for streamlined publishing.

MCP Tools for Automated Blog Writing: Complete Setup Guide
Learn how to set up MCP (Model Context Protocol) tools for automated blog writing with Claude Desktop, Cursor, and ChatGPT. Step-by-step tutorial with code examples and best practices.